金属マテリアル
マテリアルを表す抽象クラス
異なるオブジェクトに異なるマテリアルを持たせようとすると、設計の変更が必要になる。一つの選択肢として、たくさんのパラメータを持つ一般的なマテリアルを用意して、マテリアルの種類に応じて使わないパラメータには \(0\) を設定する方法がある。これは悪くないアプローチだが、他にもマテリアルの振る舞いをカプセル化する抽象マテリアルクラスを作るという方法もある。私は後者の方法を気に入っている。今書いているプログラムでは、マテリアルは次の二つの処理を行う:
- レイが散乱するか吸収されるかを判定する。
- 散乱するなら、散乱レイと減衰を求める。
ここから次の抽象クラスが導かれる:
#ifndef MATERIAL_H
#define MATERIAL_H

class material {
public:
  virtual ~material() {}
  virtual bool scatter(
    const ray& r_in, const hit_record& rec, color& attenuation, ray& scattered
  ) const = 0;
};

#endif
material.h] material クラス
レイとオブジェクトの衝突を表すデータ構造
hit_record 構造体は scatter 関数に渡す変数が増えたときに関数の引数を増やさなくて済むように導入されている。好みの問題なので、引数を使ってもよい。hittable と material を定義するにはお互いがお互いを知っておく必要があり、一種の循環参照が生じている。C++ ではコンパイラに向かってクラスの存在を示しておけば問題は起きない。次のコードの class material; がそれに当たる。
#ifndef HITTABLE_H
#define HITTABLE_H

#include "rtweekend.h"
#include "ray.h"

class material;

struct hit_record {
  point3 p;
  vec3 normal;
  shared_ptr<material> mat_ptr;
  double t;
  bool front_face;

  inline void set_face_normal(const ray& r, const vec3& outward_normal) {
    front_face = dot(r.direction(), outward_normal) < 0;
    normal = front_face ? outward_normal : -outward_normal;
  }
};
...
hittable.h] material を追加した hit_record
物体表面とレイの相互作用を処理するのが matrial::scatter 関数であり、この関数への引数はまとめて hit_record 構造体として表される。レイが物体 (例えば球) に当たると hit_record のマテリアルを表すポインタ mat_ptr に球の持つマテリアル (初期化時に main() で割り当てたもの) が代入される。hit_record が ray_color() に戻ると mat_ptr のメンバー関数が呼び出され、散乱レイが (その有無を含めて) 計算される。
実装では sphere クラスにマテリアルの参照を追加し、sphere::hit() 関数でこの参照を hit_record に追加する。ハイライトされた行に変更を示す:
class sphere: public hittable {
public:
  sphere() {}
  sphere(point3 cen, double r, shared_ptr<material> m)
    : center(cen), radius(r), mat_ptr(m) {}

  virtual bool hit(
    const ray& r, double tmin, double tmax, hit_record& rec
  ) const;

public:
  point3 center;
  double radius;
  shared_ptr<material> mat_ptr;
};

bool sphere::hit(
  const ray& r, double t_min, double t_max, hit_record& rec
) const {
  vec3 oc = r.origin() - center;
  auto a = r.direction().length_squared();
  auto half_b = dot(oc, r.direction());
  auto c = oc.length_squared() - radius*radius;
  auto discriminant = half_b*half_b - a*c;

  if (discriminant > 0) {
    auto root = sqrt(discriminant);
    auto temp = (-half_b - root)/a;
    if (temp < t_max && temp > t_min) {
      rec.t = temp;
      rec.p = r.at(rec.t);
      vec3 outward_normal = (rec.p - center) / radius;
      rec.set_face_normal(r, outward_normal);
      rec.mat_ptr = mat_ptr;
      return true;
    }
    temp = (-half_b + root) / a;
    if (temp < t_max && temp > t_min) {
      rec.t = temp;
      rec.p = r.at(rec.t);
      vec3 outward_normal = (rec.p - center) / radius;
      rec.set_face_normal(r, outward_normal);
      rec.mat_ptr = mat_ptr;
      return true;
    }
  }
  return false;
}
sphere.h] マテリアルを追加したレイと球の衝突判定
ランバーティアンの実装
material を使って前節で実装したランバーティアン (拡散) マテリアルを実装する方法は二つある。一つはレイが必ず散乱してそのときの散乱が反射率 \(R\) だと考える方法で、もう一つはレイが確率 \(R\) で減衰なしに散乱し、それ以外のときは吸収されると考える方法である。どちらでも構わないし、二つを混ぜることもできる。前者の方法を実装した簡単なクラスを次に示す:
class lambertian : public material {
public:
  lambertian(const color& a) : albedo(a) {}

  virtual bool scatter(
    const ray& r_in, const hit_record& rec, color& attenuation, ray& scattered
  ) const {
    vec3 scatter_direction = rec.normal + random_unit_vector();
    scattered = ray(rec.p, scatter_direction);
    attenuation = albedo;
    return true;
  }

public:
  color albedo;
};
sphere.h] lambertian マテリアルクラス
なお適当な確率 p で減衰が albedo/p の散乱レイを生成してもこれと同じ挙動となる。
光の鏡面反射
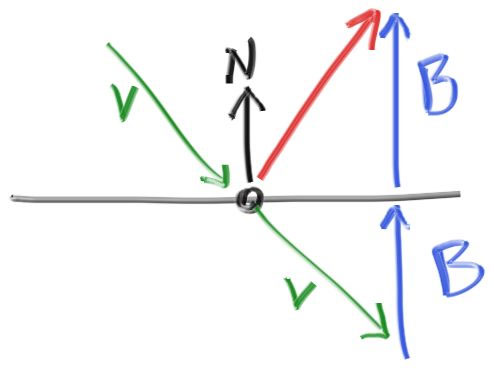
滑らかな金属では、レイがランダムに散乱することはない。さて数学の時間だ: レイは金属鏡面でどのように反射するだろうか? ここではベクトルが私たちの友達になる:

赤で示した反射レイは \(\mathbf{v} + 2\mathbf{b}\) と表される。今の実装では \(\textbf{n}\) は単位ベクトルだが、\(\textbf{v}\) はそうでない可能性がある。よって \(\textbf{b}\) の大きさは \(\mathbf{v} \cdot \mathbf{n}\) と表せる。また \(\textbf{v}\) は物体に向かうベクトルだから、マイナスが必要になる。以上より次のコードが得られる:
vec3 reflect(const vec3& v, const vec3& n) {
  return v - 2*dot(v,n)*n;
}
vec3.h] vec3 の reflect 関数
金属マテリアルはこの公式を使ってレイを反射させる:
class metal : public material {
public:
  metal(const color& a) : albedo(a) {}

  virtual bool scatter(
    const ray& r_in, const hit_record& rec, color& attenuation, ray& scattered
  ) const {
    vec3 reflected = reflect(unit_vector(r_in.direction()), rec.normal);
    scattered = ray(rec.p, reflected);
    attenuation = albedo;
    return (dot(scattered.direction(), rec.normal) > 0);
  }

public:
  color albedo;
};
material.h] metal クラスと反射レイの計算
material を使うよう ray_color() 関数を変更する必要がある:
color ray_color(const ray& r, const hittable& world, int depth) {
  hit_record rec;

  // 反射回数が一定よりも多くなったら、その時点で追跡をやめる
  if (depth <= 0)
    return color(0,0,0);

  if (world.hit(r, 0.001, infinity, rec)) {
    ray scattered;
    color attenuation;
    if (rec.mat_ptr->scatter(r, rec, attenuation, scattered))
      return attenuation * ray_color(scattered, world, depth-1);
    return color(0,0,0);
  }

  vec3 unit_direction = unit_vector(r.direction());
  auto t = 0.5*(unit_direction.y() + 1.0);
  return (1.0-t)*color(1.0, 1.0, 1.0) + t*color(0.5, 0.7, 1.0);
}
main.cc] 反射レイと減衰を使ったレイの色の計算
金属球を使ったシーン
シーンに金属球を追加しよう:
int main() {
  const auto aspect_ratio = 16.0 / 9.0;
  const int image_width = 384;
  const int image_height = static_cast<int>(image_width / aspect_ratio);
  const int samples_per_pixel = 100;
  const int max_depth = 50;

  std::cout << "P3\n" << image_width << " " << image_height << "\n255\n";


  hittable_list world;

  world.add(make_shared<sphere>(
    point3(0,0,-1), 0.5, make_shared<lambertian>(color(0.7, 0.3, 0.3))));
  world.add(make_shared<sphere>(
    point3(0,-100.5,-1), 100, make_shared<lambertian>(color(0.8, 0.8, 0.0))));
  world.add(make_shared<sphere>(
    point3(1,0,-1), 0.5, make_shared<metal>(color(.8,.6,.2))));
  world.add(make_shared<sphere>(
    point3(-1,0,-1), 0.5, make_shared<metal>(color(.8,.8,.8))));

  camera cam;

  for (int j = image_height-1; j >= 0; --j) {
    std::cerr << "\rScanlines remaining: " << j << ' ' << std::flush;
    for (int i = 0; i < image_width; ++i) {
      color pixel_color(0, 0, 0);
      for (int s = 0; s < samples_per_pixel; ++s) {
        auto u = (i + random_double()) / (image_width-1);
        auto v = (j + random_double()) / (image_height-1);
        ray r = cam.get_ray(u, v);
        pixel_color += ray_color(r, world, max_depth);
      }
      write_color(std::cout, pixel_color, samples_per_pixel);
    }
  }

  std::cerr << "\nDone.\n";
}
main.cc] 金属球を配置したシーン
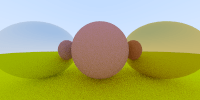
レンダリングされる画像を示す:

ぼやけた反射
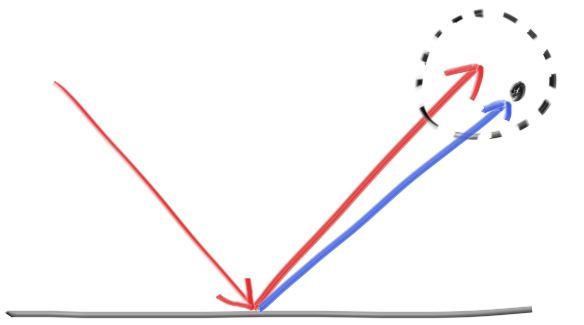
鏡面反射したレイの端点を中心とする小さな球を考えれば、反射レイの方向をランダムに変化させることができる:

球が大きければそれだけ反射は大きくぼやける。この球の半径を「ぼやけ (fuzziness)」としてマテリアルのパラメータに追加するのが自然だろう (ぼやけが \(0\) なら反射は全くぶれない)。ただしここで、ぼやけが大きい表面にほぼ水平の角度で入射したレイが表面の下に散乱する可能性があることに注意が必要となる。こういったレイは表面に吸収されたとみなすことにする。
class metal : public material {
public:
  metal(const color& a, double f) : albedo(a), fuzz(f < 1 ? f : 1) {}

  virtual bool scatter(
    const ray& r_in, const hit_record& rec, color& attenuation, ray& scattered
  ) const {
    vec3 reflected = reflect(unit_vector(r_in.direction()), rec.normal);
    scattered = ray(rec.p, reflected + fuzz*random_in_unit_sphere());
    attenuation = albedo;
    return (dot(scattered.direction(), rec.normal) > 0);
  }

public:
  color albedo;
  double fuzz;
};
material.h] fuzziness を追加した metal
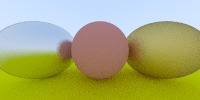
ぼやけを \(0.3\) および \(1.0\) としたレンダリング結果を示す:
