重点サンプリング付きマテリアル
ここからいくつかの節を使って、画像のノイズを減らすためにレイを光源に向かって多く放つようプログラムを改変する。光源へ多くレイを放つときの PDF を \(p_{\text{light}}(\text{direction})\) として、\(s(\text{direction})\) が大きい部分へ多くレイを放つときの PDF を \(p_{\text{surface}}(\text{direction})\) とする。PDF に関して便利なのが、複数の PDF の線形和を取って確率密度を混ぜることで別の PDF を作れることだ。例えば一番簡単な線形和 \[ p(\text{direction}) = \frac{1}{2}\cdotp p_{\text{light}}(\text{direction}) + \frac{1}{2}\cdot p_{\text{surface}}(\text{direction}) \] は PDF である。重みが正で積分が \(1\) である限り、複数 PDF を組み合わせてできる関数は PDF となる。PDF はどんなものでも構わないことを思い出そう: 任意の PDF を使ったモンテカルロ積分は真の値に収束する。よって問題は \(s(\text{direction}) \cdot \text{color}(\text{direction})\) が大きい部分の PDF を大きくする方法である。拡散表面では、これは \(\text{color}(\text{direction})\) が高い部分を推定する問題となる。
鏡面では \(s(\text{direction})\) が特定の方向の周りでのみ非常に大きくなるので、拡散表面より \(s(\text{direction})\) がずっと重要になる。実は多くのレンダラは鏡面を特殊ケースとしており、\(s/p\) を陰に計算して済ませている ──現在の私たちのコードもこうしている。
コーネルボックス
少しリファクタリングをして、ランバーティアンでないマテリアルを取り除こう。コーネルボックスのシーンを使って、モデルを生成する関数の中でカメラも生成する:
hittable_list cornell_box(camera& cam, double aspect) {
  hittable_list world;

  auto red   = make_shared<lambertian>(make_shared<solid_color>(.65, .05, .05));
  auto white = make_shared<lambertian>(make_shared<solid_color>(.73, .73, .73));
  auto green = make_shared<lambertian>(make_shared<solid_color>(.12, .45, .15));
  auto light = make_shared<diffuse_light>(make_shared<solid_color>(15, 15, 15));

  world.add(make_shared<yz_rect>(0, 555, 0, 555, 555, green));
  world.add(make_shared<yz_rect>(0, 555, 0, 555, 0, red));
  world.add(make_shared<xz_rect>(213, 343, 227, 332, 554, light));
  world.add(make_shared<xz_rect>(0, 555, 0, 555, 555, white));
  world.add(make_shared<xz_rect>(0, 555, 0, 555, 0, white));
  world.add(make_shared<xy_rect>(0, 555, 0, 555, 555, white));

  shared_ptr<hittable> box1 =
    make_shared<box>(point3(0,0,0), point3(165,330,165), white);
  box1 = make_shared<rotate_y>(box1, 15);
  box1 = make_shared<translate>(box1, vec3(265,0,295));
  world.add(box1);

  shared_ptr<hittable> box2 =
    make_shared<box>(point3(0,0,0), point3(165,165,165), white);
  box2 = make_shared<rotate_y>(box2, -18);
  box2 = make_shared<translate>(box2, vec3(130,0,65));
  world.add(box2);

  point3 lookfrom(278, 278, -800);
  point3 lookat(278, 278, 0);
  vec3 vup(0, 1, 0);
  auto dist_to_focus = 10.0;
  auto aperture = 0.0;
  auto vfov = 40.0;
  auto t0 = 0.0;
  auto t1 = 1.0;

  cam = camera(
    lookfrom, lookat, vup, vfov, aspect, aperture, dist_to_focus, t0, t1
  );

  return world;
}
main.cc] リファクタリングしたコーネルボックス
解像度を 500 × 500 として 1 ピクセルに 500 本のレイを放つと、私の Macbook (1 コア使用) では次の画像が 10 分で得られた:
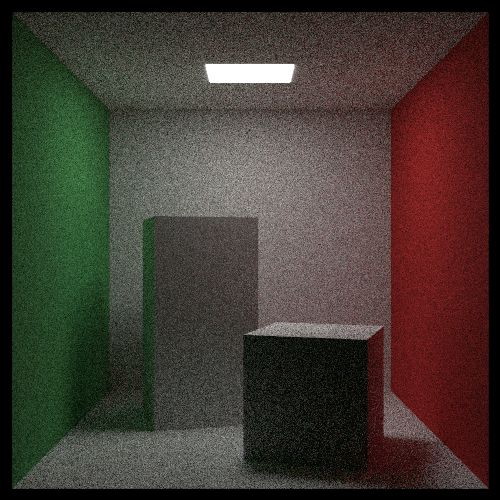
このノイズを減らすのが目標である。これからライトに向けてレイを多く放つ PDF を構築することでこれを達成する。
まず、明示的に PDF のサンプルと正規化を行うようコードを変更する。モンテカルロ積分の基本を思い出そう: \(\displaystyle \int f(x) \approx f(r)/p(r)\) である。lambertian マテリアルでは今までと同じように \(p(\text{direction}) = \cos \theta / \pi\) としてサンプルを行うことにする。
基底クラス material に重点サンプリングを追加する:
class material {
public:

  virtual bool scatter(
    const ray& r_in,
    const hit_record& rec,
    color& albedo,
    ray& scattered,
    double& pdf
  ) const {
    return false;
  }

  virtual double scattering_pdf(
    const ray& r_in, const hit_record& rec, const ray& scattered
  ) const {
    return 0;
  }

  virtual color emitted(double u, double v, const point3& p) const {
    return color(0,0,0);
  }
};
material.h] 重点サンプリングを追加した material クラス
lambertian クラスは次のようになる:
class lambertian : public material {
public:
  lambertian(shared_ptr<texture> a) : albedo(a) {}

  virtual bool scatter(
    const ray& r_in,
    const hit_record& rec,
    color& alb,
    ray& scattered,
    double& pdf
  ) const {
    point3 target = rec.p + rec.normal + random_unit_vector();
    scattered = ray(rec.p, unit_vector(target-rec.p), r_in.time());
    alb = albedo->value(rec.u, rec.v, rec.p);
    pdf = dot(rec.normal, scattered.direction()) / pi;
    return true;
  }

  double scattering_pdf(
    const ray& r_in, const hit_record& rec, const ray& scattered
  ) const {
    auto cosine = dot(rec.normal, unit_vector(scattered.direction()));
    return cosine < 0 ? 0 : cosine/pi;
  }

public:
  shared_ptr<texture> albedo;
};
material.h] 重点サンプリングを追加した lambertian クラス
ray_color 関数にも少しだけ変更が加わる:
color ray_color(
  const ray& r, const color& background, const hittable& world, int depth
) {
  hit_record rec;

  // 反射回数が一定よりも多くなったら、その時点で追跡をやめる
  if (depth <= 0)
    return color(0,0,0);

  // レイがどのオブジェクトとも交わらないなら、背景色を返す
  if (!world.hit(r, 0.001, infinity, rec))
    return background;

  ray scattered;
  color attenuation;
  color emitted = rec.mat_ptr->emitted(rec.u, rec.v, rec.p);
  double pdf;
  color albedo;

  if (!rec.mat_ptr->scatter(r, rec, albedo, scattered, pdf))
    return emitted;

  return emitted
     + albedo * rec.mat_ptr->scattering_pdf(r, rec, scattered)
          * ray_color(scattered, background, world, depth-1) / pdf;
}
main.cc] 重点サンプリングを追加した ray_color 関数
レンダリングされる画像は変わらないはずである。
ランダムな半球サンプリング
ここで実験として、異なるサンプリング戦略を試してみよう。第一巻で示した、物体表面の半球上を一様ランダムにサンプルする方法を使う。このとき \(p(\text{direction}) = \frac{1}{2}\pi\) であり、scatter 関数は次のようになる:
bool scatter(
  const ray& r_in,
  const hit_record& rec,
  color& alb,
  ray& scattered,
  double& pdf
) const {
  vec3 direction = random_in_hemisphere(rec.normal);
  scattered = ray(rec.p, unit_vector(direction), r_in.time());
  alb = albedo->value(rec.u, rec.v, rec.p);
  pdf = 0.5 / pi;
  return true;
}
material.h] 変更した scatter 関数
これまでと同じ画像が得られるが、ノイズの付き方が変わる。
ノイズを減らすために、もう少し理論を説明する。