長方形とライト
ライティングはレイトレーサーの重要な要素である。初期の単純なレイトレーサーは点光源や平行光源といった抽象化された光源を使っていた。現代的なアプローチではもっと物理ベースのライトが使われるようになっており、光源は位置と大きさを持つ。この現代的な光源を実装するには、任意の通常のオブジェクトがシーン内に光を放てるよう設計を変更する必要がある。
発光マテリアル
まず光源となる発光マテリアルを作ろう。material に emitted() 関数を追加する必要がある (代わりに hit_record に変数 emitted を追加してもよい ──設計が少し変わるだけだ)。背景と同じくこの関数はレイの色を計算するだけで、反射レイは計算しない。発光する拡散マテリアルは非常に簡単に書ける:
class diffuse_light : public material  {
public:
  diffuse_light(shared_ptr<texture> a) : emit(a) {}

  virtual bool scatter(
    const ray& r_in, const hit_record& rec, color& attenuation, ray& scattered
  ) const {
    return false;
  }

  virtual color emitted(double u, double v, const point3& p) const {
    return emit->value(u, v, p);
  }

public:
  shared_ptr<texture> emit;
};
material.h] diffuse_light クラス
発光しないマテリアルで emitted() を実装しないで済むように、基底クラスで黒を返す emitted() を実装しておく:
class material {
public:
  virtual color emitted(double u, double v, const point3& p) const {
    return color(0,0,0);
  }

  virtual bool scatter(
    const ray& r_in, const hit_record& rec, color& attenuation, ray& scattered
  ) const = 0;
};
material.h] material クラスに emitted 関数を追加する
背景を黒くする
次に背景を完全な黒にして、シーン中のライトが全て光源から来るようにする。ray_color() 関数に背景色を表す引数 background を追加して、さらにマテリアルの emitted の値を計算に入れる:
color ray_color(
  const ray& r, const color& background, const hittable& world, int depth
) {
  hit_record rec;

  // 反射回数が一定よりも多くなったら、その時点で追跡をやめる
  if (depth <= 0)
    return color(0,0,0);

  // レイがどのオブジェクトとも交わらないなら、背景色を返す
  if (!world.hit(r, 0.001, infinity, rec))
    return background;

  ray scattered;
  color attenuation;
  color emitted = rec.mat_ptr->emitted(rec.u, rec.v, rec.p);

  if (!rec.mat_ptr->scatter(r, rec, attenuation, scattered))
    return emitted;

  return emitted
         + attenuation * ray_color(scattered, background, world, depth-1);
}
...

int main() {
  ...
  const color background(0,0,0);
  ...
        pixel_color += ray_color(r, background, world, max_depth);
  ...
}
main.cc] 発光マテリアルに対応した ray_color() 関数
長方形オブジェクト
続いて長方形を作ろう。長方形は人工的な環境を組み立てるのに便利である。私は辺が軸に平行な長方形が実装しやすいので好きだ (後でインスタンシングを実装すれば回せるようになる)。
まず \(z\) 軸と垂直な平面を考える。\(z\) 軸と垂直な平面は \(z\) 座標の値によって \(z = k\) と定義され、その平面上の辺が軸に平行な長方形は \(x=x_{0}\), \(x=x_{1}\), \(y=y_{0}\), \(y=y_{1}\) という四本の直線で定義される。
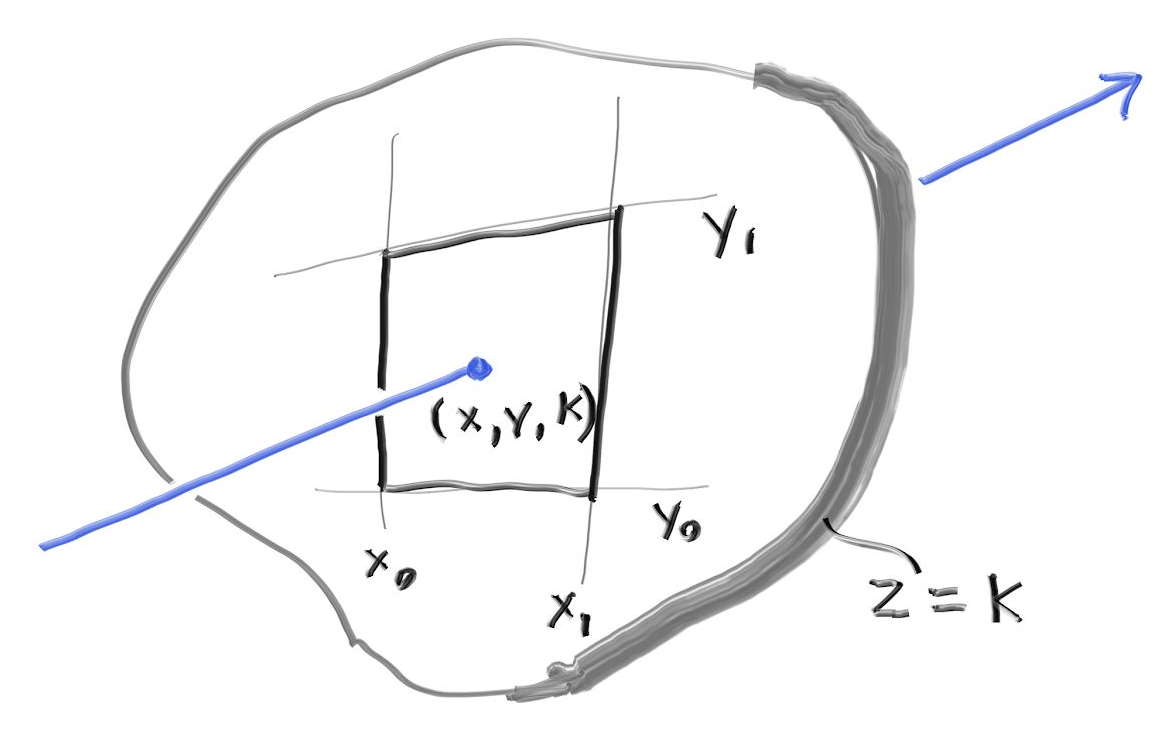
この長方形とレイが交わるかを判定するために、まずレイが平面 \(z = k\) と交わる点を求める。レイは \(\textbf{P}(t) = \textbf{A} + t \textbf{b}\) と表されるから、その \(z\) 成分は \(P_{z}(t) = A_{z} + t b_{z}\) となることは前に見た。ここから \(z = k\) における \(t\) の値が分かる: \[ t = \frac{k-A_z}{b_z} \] \(t\) が分かれば、\(\textbf{P}(t) = \textbf{A} + t \textbf{b}\) から交点の \(x\) 座標と \(y\) 座標も分かる: \[ x = A_x + t b_x ,\quad y = A_y + t b_y \]
レイが長方形と交わるのは \(x_{0} \lt x \lt x_{1}\) かつ \(y_{0} \lt y \lt y_{1}\) のときである。
今考えている長方形は辺が軸に平行だから、AABB が無限に薄くなる。AABB 階層を作るときにこれでは具合が悪いので、AABB は全ての方向に有限の大きさを持つと定め、長方形の AABB はとても薄いがゼロでない長さの辺を持つものとする。
xy_rect クラスは次のようになる:
class xy_rect: public hittable {
public:
  xy_rect() {}

  xy_rect(
    double _x0, double _x1,
    double _y0, double _y1,
    double _k,
    shared_ptr<material> mat
  ) : x0(_x0), x1(_x1),
      y0(_y0), y1(_y1),
      k(_k),
      mp(mat) {}

  virtual bool hit(const ray& r, double t0, double t1, hit_record& rec) const;

  virtual bool bounding_box(double t0, double t1, aabb& output_box) const {
    // AABB の辺の長さはゼロであってはならないので、
    // z 方向に少しだけ厚みを持たせる
    output_box = aabb(point3(x0,y0, k-0.0001), point3(x1, y1, k+0.0001));
    return true;
  }

public:
  double x0, x1, y0, y1, k;
  shared_ptr<material> mp;
};
aarect.h] \(z\) 軸に垂直な平面を表す xy_rect クラス
hit 関数は次の通りである:
bool xy_rect::hit(const ray& r, double t0, double t1, hit_record& rec) const {
  auto t = (k-r.origin().z()) / r.direction().z();
  if (t < t0 || t > t1)
    return false;
  auto x = r.origin().x() + t*r.direction().x();
  auto y = r.origin().y() + t*r.direction().y();
  if (x < x0 || x > x1 || y < y0 || y > y1)
    return false;
  rec.u = (x-x0)/(x1-x0);
  rec.v = (y-y0)/(y1-y0);
  rec.t = t;
  auto outward_normal = vec3(0, 0, 1);
  rec.set_face_normal(r, outward_normal);
  rec.mat_ptr = mp;
  rec.p = r.at(t);
  return true;
}
aarect.h] xy_rect::hit 関数
オブジェクトを光源にする
長方形を光源として設定する:
hittable_list simple_light() {
  hittable_list objects;

  auto pertext = make_shared<noise_texture>(4);
  objects.add(make_shared<sphere>(
    point3(0,-1000,0), 1000, make_shared<lambertian>(pertext))
  );
  objects.add(make_shared<sphere>(
    point3(0,2,0), 2, make_shared<lambertian>(pertext))
  );

  auto difflight = make_shared<diffuse_light>(make_shared<solid_color>(4,4,4));
  objects.add(make_shared<sphere>(point3(0,7,0), 2, difflight));
  objects.add(make_shared<xy_rect>(3, 5, 1, 3, -2, difflight));

  return objects;
}
main.cc] 長方形の光源
得られるのは次の画像である:
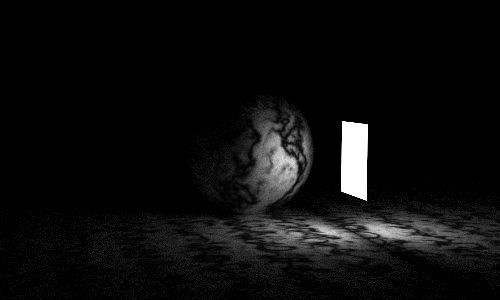
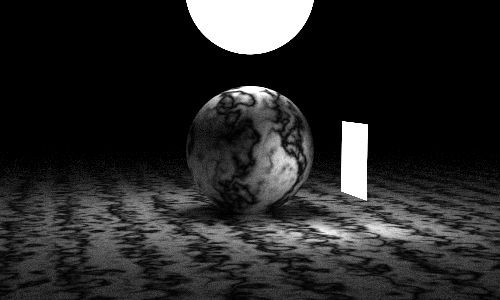
光源が \((1, 1, 1)\) よりも明るい点に注目してほしい。これによって他のオブジェクトを照らせるようになる。
球のライトも作ればこうなる:
その他の軸に垂直な長方形
他の軸に関する長方形を追加して、有名なコーネルボックス (Cornell Box) を作ろう。
xy_rect と yz_rect はこうなる:
class xz_rect: public hittable {
public:
  xz_rect() {}

  xz_rect(
    double _x0, double _x1,
    double _z0, double _z1,
    double _k,
    shared_ptr<material> mat
  ) : x0(_x0), x1(_x1),
      z0(_z0), z1(_z1),
      k(_k),
      mp(mat) {}

  virtual bool hit(const ray& r,
    double t0, double t1, hit_record& rec) const;

  virtual bool bounding_box(double t0, double t1, aabb& output_box) const {
    // AABB の辺の長さはゼロであってはならないので、
    // y 方向に少しだけ厚みを持たせる
    output_box = aabb(point3(x0,k-0.0001,z0), point3(x1, k+0.0001, z1));
    return true;
  }

public:
  double x0, x1, z0, z1, k;
  shared_ptr<material> mp;
};

class yz_rect: public hittable {
public:
  yz_rect() {}

  yz_rect(
    double _y0, double _y1,
    double _z0, double _z1,
    double _k,
    shared_ptr<material> mat
  ) : y0(_y0), y1(_y1),
      z0(_z0), z1(_z1),
      k(_k),
      mp(mat) {}

  virtual bool hit(const ray& r, double t0, double t1, hit_record& rec) const;

  virtual bool bounding_box(double t0, double t1, aabb& output_box) const {
    // AABB の辺の長さはゼロであってはならないので、
    // x 方向に少しだけ厚みを持たせる
    output_box = aabb(point3(k-0.0001, y0, z0), point3(k+0.0001, y1, z1));
    return true;
  }

public:
  double y0, y1, z0, z1, k;
  shared_ptr<material> mp;
};
aarect.h] \(y\) 軸および \(x\) 軸に平行な長方形を表すクラス
hit 関数もほとんど変わらない:
bool xz_rect::hit(const ray& r, double t0, double t1, hit_record& rec) const {
  auto t = (k-r.origin().y()) / r.direction().y();
  if (t < t0 || t > t1)
    return false;
  auto x = r.origin().x() + t*r.direction().x();
  auto z = r.origin().z() + t*r.direction().z();
  if (x < x0 || x > x1 || z < z0 || z > z1)
    return false;
  rec.u = (x-x0)/(x1-x0);
  rec.v = (z-z0)/(z1-z0);
  rec.t = t;
  auto outward_normal = vec3(0, 1, 0);
  rec.set_face_normal(r, outward_normal);
  rec.mat_ptr = mp;
  rec.p = r.at(t);
  return true;
}

bool yz_rect::hit(const ray& r, double t0, double t1, hit_record& rec) const {
  auto t = (k-r.origin().x()) / r.direction().x();
  if (t < t0 || t > t1)
    return false;
  auto y = r.origin().y() + t*r.direction().y();
  auto z = r.origin().z() + t*r.direction().z();
  if (y < y0 || y > y1 || z < z0 || z > z1)
    return false;
  rec.u = (y-y0)/(y1-y0);
  rec.v = (z-z0)/(z1-z0);
  rec.t = t;
  auto outward_normal = vec3(1, 0, 0);
  rec.set_face_normal(r, outward_normal);
  rec.mat_ptr = mp;
  rec.p = r.at(t);
  return true;
}
aarect.h] xz_rect および yz_rect の hit 関数
空のコーネルボックスの作成
コーネルボックスは光と拡散表面の相互作用をモデル化する研究のために 1984 年に考案された。五つの壁とライトでコーネルボックスを作ろう:
hittable_list cornell_box() {
  hittable_list objects;

  auto red   = make_shared<lambertian>(make_shared<solid_color>(.65, .05, .05));
  auto white = make_shared<lambertian>(make_shared<solid_color>(.73, .73, .73));
  auto green = make_shared<lambertian>(make_shared<solid_color>(.12, .45, .15));
  auto light = make_shared<diffuse_light>(make_shared<solid_color>(15, 15, 15));

  objects.add(make_shared<yz_rect>(0, 555, 0, 555, 555, green));
  objects.add(make_shared<yz_rect>(0, 555, 0, 555, 0, red));
  objects.add(make_shared<xz_rect>(213, 343, 227, 332, 554, light));
  objects.add(make_shared<xz_rect>(0, 555, 0, 555, 0, white));
  objects.add(make_shared<xz_rect>(0, 555, 0, 555, 555, white));
  objects.add(make_shared<xy_rect>(0, 555, 0, 555, 555, white));

  return objects;
}
main.cc] 空のコーネルボックスシーン
視点は次のように設定する:
const auto aspect_ratio = 1.0;
const int image_width = 500;
const int image_height = static_cast<int>(image_width / aspect_ratio);
...
point3 lookfrom(278, 278, -800);
point3 lookat(278,278,0);
vec3 vup(0,1,0);
auto dist_to_focus = 10.0;
auto aperture = 0.0;
auto vfov = 40.0;

camera cam(
  lookfrom, lookat, vup, vfov, aspect_ratio, aperture, dist_to_focus, 0.0, 1.0
);
main.cc] 視点のパラメータ
レンダリングされる画像を 図 2.23 に示す。